
In this articles, we will understand what Apache NiFi is, how we can use it and where it fits in the whole big data ecosystem.
[two_first]1. Apache NiFi
Apache NiFi is a data pipeline in the most simple words. It is built to automate the flow of data from one system to another. When we need a continuous flow of data from a system to another, this is where Apache NiFi comes in handy, we can connect the system with the NiFi dataflows.
Before going further, we will need to understand few terminologies which will be used quite frequently throughout the articles and is the basic terms used in Apache NiFi.
Processor: The basic building blocks of NiFi are the components which perform the tasks of creating, receiving, sending, computing, transforming the data coming in the pipeline. These building blocks are referred to as Processors
Flow Files: All the data coming in NiFi data pipelines will be in the form of flowfiles. In flowfiles, we will be working with two components called Attributes and Content.
[/two_first][two_second]
[/two_second]
- Content: Content is the actual data coming in the dataflow.
- Attributes: Attrubtes are the key-value pairs which define some attributes related to the flowfile or data in that flowfile.
2. Installing NiFi
In this section we will learn about how to install NiFi in different operating systems.
2.1. Prerequisites
Apache NiFi can run as a standalone version on a single system as well as on enterprise cluster of machines. So following are just the basic prerequisites required to run NiFi:
- Java 8 or newer
- Operating systems: Linux, MacOS, Windows
- Web Browsers: Google Chrome, Safari, Firefox, Microsoft Edge
Note: Besides these requirements, memory and hardware of the system depend on the kind of flow NiFi will be handling. NiFi stores the data in memory while processing, so higher the throughput of the flow, higher the requirement of the memory.
2.2. Installation
As of this writing, the latest available version of Apache NiFi is 1.3.0 which can be downloaded from Download Here
The package is available as “tarball” and “zip” format and its installation is quite straightforward:
Linux
Download the tarball package from the above link. Extract the downloaded file and place it in an appropriate directory from where you want to run NiFi.
Windows
For windows users, the procedure is same as Linux only difference being, you will need to download zip format. Once it is downloaded, unzip it and place in a folder of your choice.
MacOS
Mac users have two options available. You can either download the tarball package, unpack it and place it in a directory of your choice from where you want to run NiFi.
The second option is to use Homebrew, if you have it installed. To install via Homebrew, you will just need to run the command brew install nifi.
Once NiFi is installed, use the following commands to start it:
Linux
From the <installationDir>/bin and run ./nifi.sh <command>
start: To start the NiFi in background.stop: To stop Apache NiFi.status: To check the status of NiFirun: To run Apache NiFi in the foreground (Use Ctrl+C to shutdown in this case)
Windows
To start Apache NiFi from Windows machine, go to <installationDir>/bin and double clisk on run-nifi.bat to run the batch file which will start Apache NiFi in foreground. Use Ctrl+C to shutdown NiFi.
MacOS
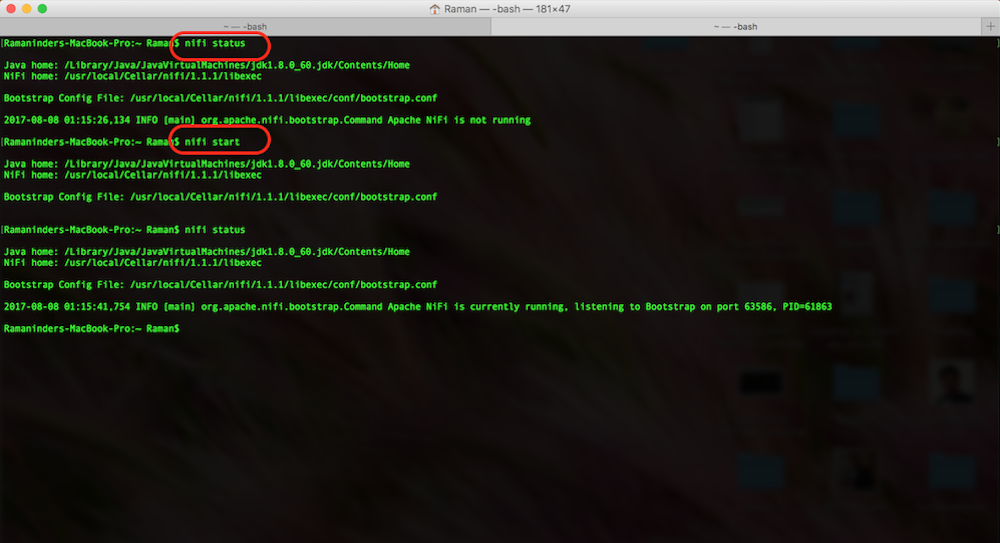
To start NiFi from MacOS, simple use the commend nifi start. Similarly the status can be checked using the command nifi status
3. Introduction to the UI
Once Apache Nifi is started successfully, we can go ahead and navigate to the UI. The default port on which NiFi runs is 8080. Open the browser of your choice and navigate to http://localhost:8080/nifi. This will bring up the NiFi UI, you will see the blank canvas (as shown below) for now as we do not have any NiFi dataflows running at the moment.
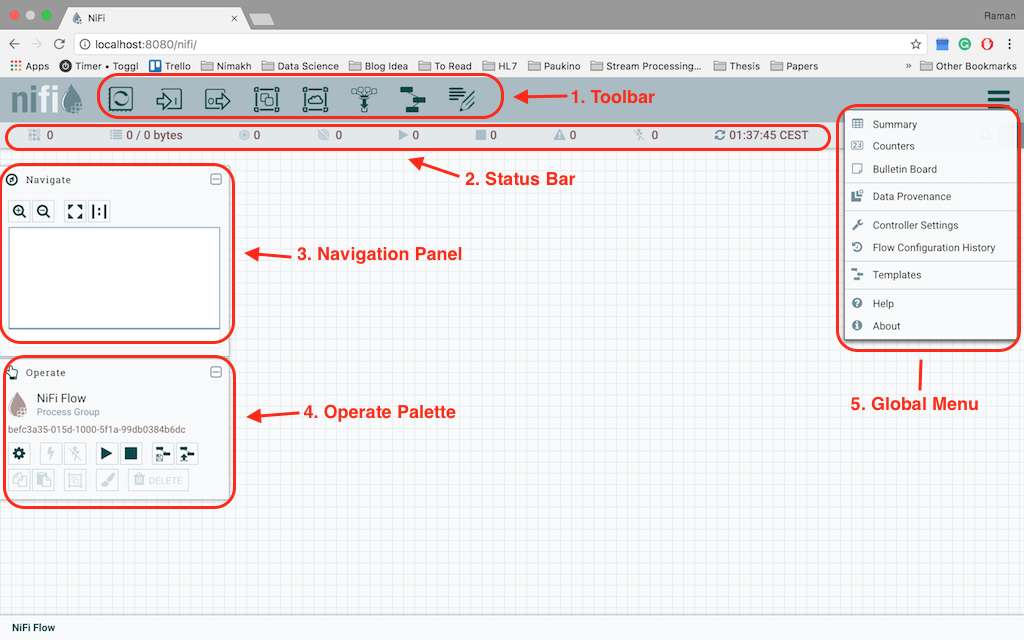
Following are the sections market in the above screenshot:
- This is the toolbar which we will be using the most. It provides the options to add processes, input/output ports, process groups, remote process groups, template and funnel to the flow.
- Below the toolbar is the status bar for the NiFi. It gives the indications of the number of nodes in the cluster currently connected, the amount of data being processed, the number of processes currently running, stopped or disabled
- Third component is the navigation bar which is used to navigate through the NiFi board. It will show the complete map of all the flows, group, processes on the board and can be used to navigate in NiFi UI.
- The Fourth component is the operate palette which provides information about the process group currently in selection and all the available actions which can be taken on that particular group.
- On the right-hand side is the fifth component, it is a drop-down menu from the upper-right corner. It is the global menu which provides all the available actions on global label like cluster level notifications, access to bulletin board, data provenance, controller settings etc.
4. Creating the first dataflow
In this section, we will have a look at how we can create a dataflow. We will start with adding the processors to NiFi canvas, configuring them, joining the processors to finish the dataflow and finally running the dataflow.
4.1. Adding the first processor
To add a Processor to our canvas, drag the Processor icon (first icon in the toolbar) into the canvas and drop it there. As soon as we drop the processor on the canvas, it will open up a dialog box with the list of all the available processors.
Following is the screenshot of the dialog box.
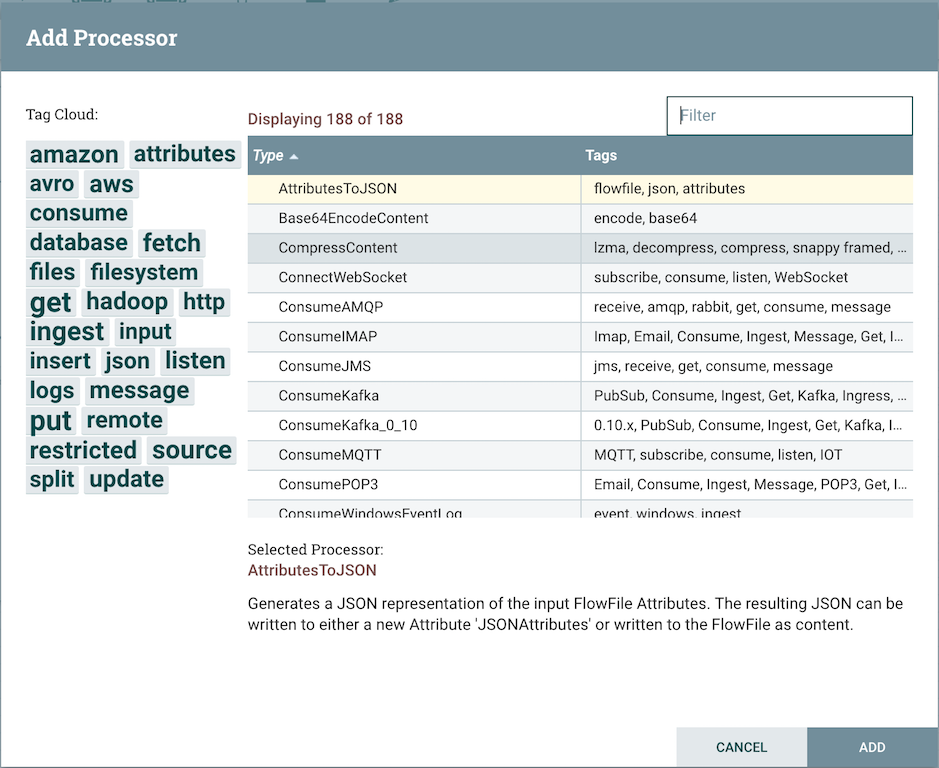
There are a large number of processors available, to find the needed processor type the keyword in the filter text box on the right top of the dialogue box. For example, let’s start by adding a processor to read the file from local storage. Type file in the dialogue box and it will filter the processors which have “file” as a tag. Select “GetFile” processor and click add, it will add the processor to the canvas.
4.2. Configuring the processor
To configure the processor, right click on the processor and select configure or select the processor and click the gear symbol in the operate palette. It will open up another dialogue box where we can set up the configuration values.
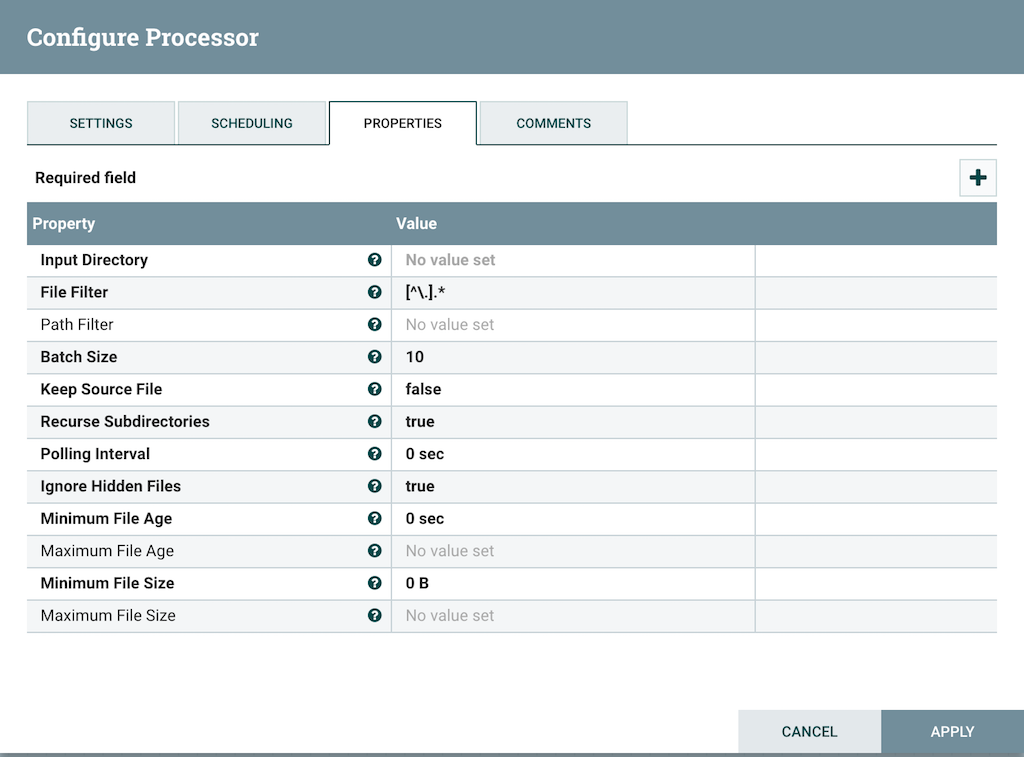
The configurations which are in bold are compulsory setting and others are optional. Every processor will have a different set of configurations based on their task. For example, in this case, we will need to provide the Input Directory from where the file will be read. Other bold configurations have default values already set and we may skip those. If you are unsure what a particular configuration property of a processor, we can hover over the Help icon (? present next to the name of the property) in order to read a description of the property.
4.3. Connecting processors
Once we have more than one processors on the canvas and we want the flowfiles to flow from one to another, we will need to connect these processors together. Each Processor has a set of defined relationships that it is able to send data to. When a Processor finishes processing the incoming flowfile, it passes the flowfile to one of these relations. For example, many processors will have two relations: success and failure. Users are then able to configure data to be routed through the flow one way if the processor is able to successfully process the data and route the data through the flow in a completely different manner if the processor cannot process the data for some reason.
Let’s add another processor that we can connect the GetFile Processor to. Let get a simple processor which will log the attributes that exist for the flowfile. We will add a LogAttributes Processor and configure it. We can now send the output of the GetFile Processor to the LogAttribute Processor. Hover over the GetFile Processor with the mouse and a connection icon will appear over the middle of the processor. We can drag this icon from the GetFile processor to the LogAttribute processor. This will open up the dialogue box like the one below:
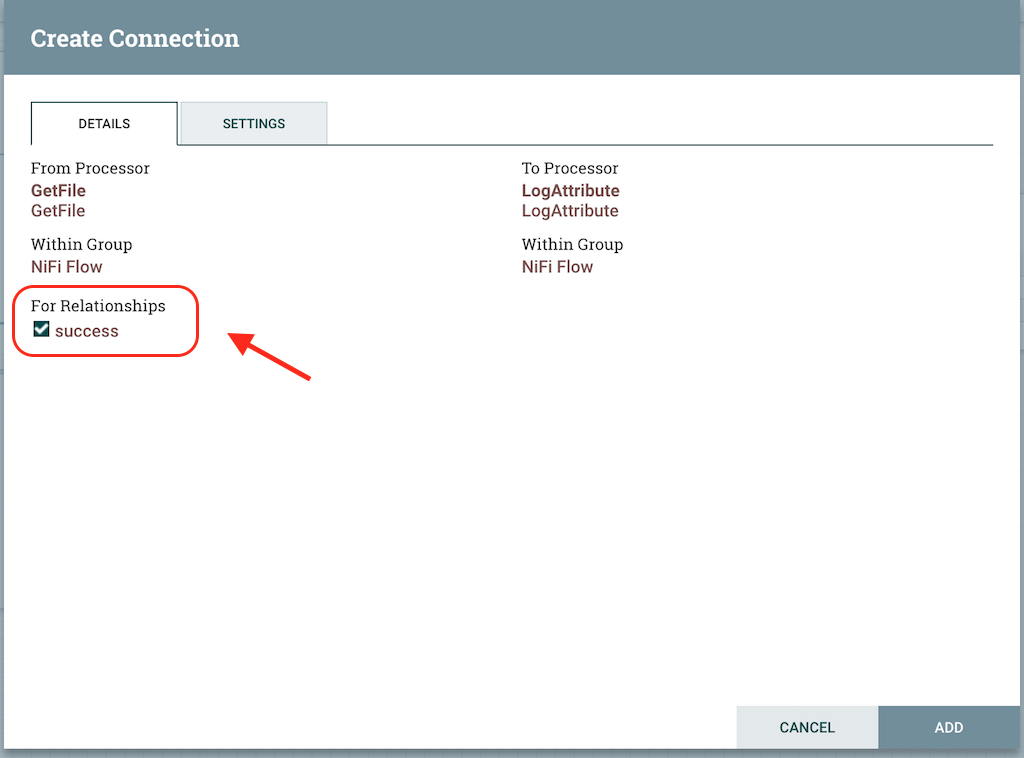
It will list all the available connections we can set up for the processor. In the case of GetFile we only have success relation available, so we select that relations and click on Add. This will add the connection from GetFile processor to LogAttributes processor.
The data flow on canvas will look like this:
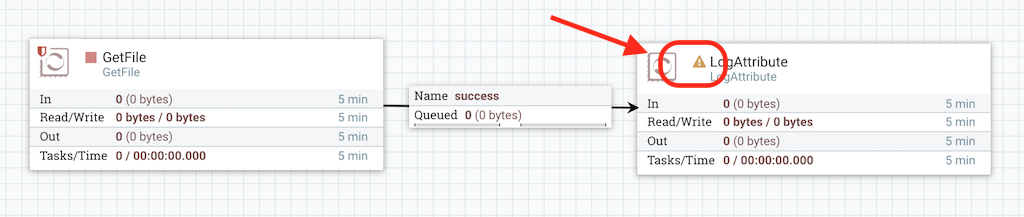
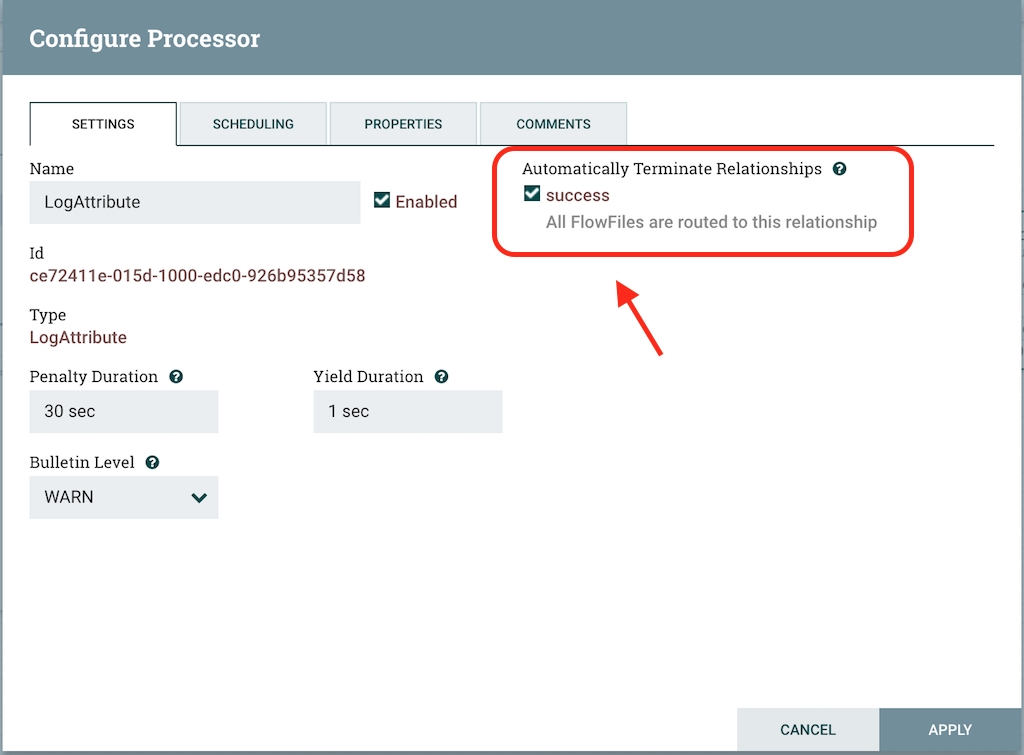
If you look at the market place in the LogAttribute processor, it shows that their is some issue with the processor. It is in an invalid state and the reason is that its success relationship has not been connected to anything. We can solve this issue by setting the success relations of LogAttribute to be Auto Terminating that means that NiFi should consider the flowfile’s which are successfully processed to be no longer needed and “drop” the data. To do this, we configure the LogAttribute Processor. On the Settings tab, on the right-hand side we can check the box next to the success Relationship to Auto Terminate the data. Clicking OK will close the dialog and show that both Processors are now stopped as shown in the screenshot below:
4.4. Starting and Stopping the processors
Now we have our first and possibly the most simple flow ready. We have both the processors in the Stop stage rightnow. In order to start the processors, we can click on each one individually and then right-click and choose the Start menu item. As an alternative to using the context menu, we can select the processors and then click the Start icon in the Operate palette. We can also use Ctrl+A or cmd+A select all the processes and then click on the Start in the Operate palette to start all the processors in a single go.
Once started, the icon in the top-left corner of the Processors will change from a stopped icon to a running icon. We can then stop the Processors by using the Stop icon in the Operate palette or the Stop menu item.
5. Conclusion
This brings us to the end of the first introductory tutorial on Apache NiFi. We have learned how to setup Apache NiFi, understood the UI, how to add processors and create data flows. This is just the tip of the iceberg and Apache NiFi is able to do much more than this with all the processors availalbe and other complex functionality. I hope this article helps you in getting started with Apache NiFi. To read more about Apache NiFi, please subscribe to the blog.